
This part of the recipe is all about decoration; for the first half of the Writing Set, see my earlier post.
You will need:
Ribbon (in a colour of your choice), I chose green
Decorations (that go with your colour choice), I chose keys and a chinese coin
Glue gun
Damp cloth
1. The letter holder thing that I started with had a slightly wider base than its walls, so I decided to add my trim just above that to accentuate the shape. I measured a length of green ribbon against the perimeter of the box, and glued it in place with the hot melt.

2. Next I had a rummage around my local bead shop for some large beads that would work as accents. I found two sort of Steam-punky keys (which are a symbol of knowledge, and therefore appropriate for a writing set) and a silver Chinese coin with dragons on (for good luck). First, I measured the middle point on the front of the letter holder, marking it with a bit of tailor's chalk, then glued the coin to the front (making sure that it was the right way up). It looked a bit strange on there on its own, so I added a sort of tassel of ribbons to the centre of it.
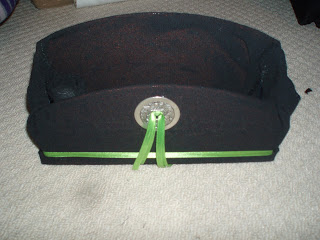
3. I lined up the keys on the sides of the box, slanting slightly, to cover the edge of the seam, and glued those in place.

4. Using a damp cloth I cleared away any excess glue from around the box and finished smoothing out any remaining wrinkles in the fabric.

Voila! The finished writing set. I thought it turned out rather well, and from her reaction I'd say Bones appreciated the effort :)

No comments:
Post a Comment