Styna, Munchkin and Bones!

Styna, Munchkin and Bones!
Mischief Managed!

Wednesday, 25 January 2012

Luna Lovegood Scarf


One of the many things I put together for people for Christmas was this gorgeous crocheted scarf. I haven't crocheted for a long time, and I thought it high time that I re-learn the skill, particularly as I have Krystyna around to give me a hand when I get stuck on the whole US/English mis-translations.

It's one of the reasons that I haven't done any for a while - when I was teaching crochet to my fellow crafters at our University Craftiness Society I got entirely confused because the size of my projects never turned out right. Krystyna has since informed me that there's a completely different notation system for England compared to the US, so I'm re-reading all of my patterns carefully to see where I've been going wrong.

Anyway, Krystyna introduced me to a beautiful pattern for the Luna Lovegood scarf from Harry Potter, created by pinkleo. It's such a pretty scarf, and I thought it would be perfect for my friend Rowena, and for my Granny. I decided to make the scarf shorter than the original pattern, partly because of time constraints, and partly because my Granny prefers shorter scarves; pinkleo's pattern calls for a starting chain of 383, I used 290 for my shorter length version. In the end, I ended up making it from one 50g ball of King Cole Galaxy, which has sequins woven into the yarn for extra sparkles, and knits up as DK, with a size 4.5 hook. I used 'Mercury' since it fit so well with the original colour - though I'm considering trying it out in 'Venus' (black) or purple at some point.

It turned out to be beautifully soft - I was a little worried that the sequins might be scratchy, but they really weren't - and looked great! The pattern was easy to follow (once I'd translated it from US to UK), and one of pinkleo's friends, ariaya made up a chart for it, which was great to refer to when I got stuck. It's a pretty good pattern for beginners who are looking for a bit of a challenge. I'd very much recommend both the pattern and the yarn.

If you need a good hook size converter from US to UK or back again, try Yarn Forward's helpful guide; they also do a decent stitch converter, too.

Happy crocheting!

Wednesday, 18 January 2012

Happy New Year! (2012)

A brilliant and belated happy new year to the lot of you!

It's been a busy year, what with blogging and writing and looking for work, and not all of it good, but it never is, really. Still, it's been a reasonably good one, and hopefully this year can only get better :)

To business: the new year welcomes (or rather, welcomes back) the lovely Krystyna, who will be blogging with us on a more permanent basis (on the basis that she does more craft than us anyway ). So give her a warm, crafty welcome!

Many crafty things, are - as usual - afoot. You've got all the weird and wonderful things I made for friends and relatives over christmas to look forwards to, along with several new projects to add to the list. My wonderful Mum, JacAbsolute, sent me vouchers for Collinette, which were immediately put to good use in the form of a massive bag of ends for a scrap-blanket and the wherewithal to make a lovely perugino throw, but more about those later.

I wanted to kick the year off with a minor personal celebration (I finally finished one of my long-standing projects) but I appear to have temporarily mislaid said project, so that will have to wait. *facepalm*

Instead, I'm going to wow you with two amazing blogs that I've been following. These ladies are exceptionally talented (as you'll see) and are well worth a look, for inspiration and good humour.

The first blog is The Sunroom, which is run by a veritable goddess of crochet. I found the blog in November, and managed to lose most of a day simply gaping at her many and magnificent designs, many of which have very good how-tos. As an independent fibre artist, many of her patterns are for sale, and well worth the
price - though she very kindly includes a fair few for free on the blog (one of which I hope to be trying out this year), along with the odd tasty recipe (the toffee apples were amazing). I cannot recommend this blog enough. If you love crochet - and intelligent use of vibrant colour - then go right over there and have a nosey!

Here are just two of her creations:


The second blog I'd like to recommend is Kneurotic Knitter. I've been following Kneurotic for a year or so now, and I've seldom seen so much patience and ingenuity put into knitting. Every project that this lady produces seems to turn out perfectly - I am so jealous of her talent. If you want a look at how good knitting can get then I highly recommend that you pop over to see her. She seems to have tried her hand at every kind of knitting going, and is not afraid of a challenge, as her most recent post affirms. Definitely one to watch :)

Here are some beautifully put together items:


(Images: Granny Stripe Shawl and Tutti Frutti Blanket both belong to The Sunroom; Autumn Rose Pullower and Three Bridesmaid Shawls belong to Kneurotic Knitter. No infringement of anything intended)

Thursday, 24 November 2011

I'm with Eeyore on This One...


First, an apology: Bonesy and I are doing NaNoWriMo at the minute and have therefore been concentrating all our available words on our novels, hence the lack of updates. So, sorry! We've still been crafting away of an evening, though, so expect a flurry of posts come december (since mine are largely christmas and birthday related, they're likely to be really cryptic) - including a couple of extra special ones about Bonesy's new shop, and our new partner, Krystyna.

But for now, I'm afraid you're stuck with my mini-rant :)


Do you know what I hate?

This:


I mean, how difficult is it to join two pieces of yarn together without using a knot? Particularly raw wool fleece, and particularly when the culprit is a professional textiles company. And the sad thing, it's not just them - I've found knots in yarns from all manner of companies, and they all know how to fix it. I suppose it's just simpler not to.

So if you get a knot in the middle of your yarn (and it's wool, rather than cotton or acrylic) this is what to do:

Splay out the fibres at the ends of the yarn, and get wet (preferably using water); then overlap the two ends and rub them together between your hands in order to felt them. Easy.

See? :


Much better.

Ok, rant over :D

Friday, 14 October 2011

Gemma's Wand


As part of her birthday present, I made Bonesy a wand.


You will need:

A stick (should be roughly the right length and feel good in the hand)

Cutting tools

Knife

Sandpaper

Ribbon (optional)

Charm (optional)

Glue gun (optional)


Common Sense (always be very careful when handing cutting tools and blades)


1. Luckily, I have access to an oak tree (planted by my Uncle), so I cut a couple of sticks from one of the branches and left them to dry for a couple of weeks, but found sticks are just as good. If you don't know what wood it is, it might be worth stripping the bark off part that you don't intend to use and seeing what colour it turns as it dries. The wood I chose was white oak, which looks really pretty when it dries, and a little (creepily) like bone, which seemed appropriate, given that this was for Bones :).


2. When the wood was dry, I chose a piece of stick with a helpful knobbly bit in the middle that looked like it would make a good handle-top. Then, I cut the wand to a good size, which more or less means 'a size that feels right to you, and doesn't look too silly when wafting about'; I made sure that it was slightly bigger at the 'magic' end to allow for further shrinkage through drying and shaping.


3. Next, I stripped the bark from the 'wand end', up to the knobbly bit at the top of the handle, and shaped the tip of the wand to be slightly pointy.


4. I sanded the top of the wand to make it smooth, and to remove any remaining bits of bark. The wand looked pretty good at this point, and I'm all for servicable wands, but since this was a special occasion, I decided to personalise it a bit.


5. Cutting a length of ribbon (matching the ribbon I used for the Witch's Writing Set), I secured one end of the ribbon to the top of the handle with the glue gun and wrapped the ribbon tightly around the handle. I threaded a silver leaf charm onto the ribbon and continued wrapping until I ran out of ribbon, tucking the end in and securing it with the glue gun.


And there you have it, a white oak wand, for a white witch :)

Witch's Writing Set, Part Two


This part of the recipe is all about decoration; for the first half of the Writing Set, see my earlier post.


You will need:

Ribbon (in a colour of your choice), I chose green

Decorations (that go with your colour choice), I chose keys and a chinese coin

Glue gun

Damp cloth


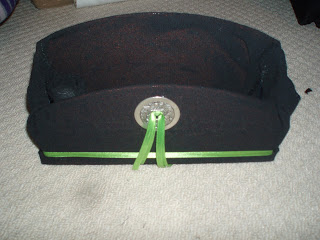
1. The letter holder thing that I started with had a slightly wider base than its walls, so I decided to add my trim just above that to accentuate the shape. I measured a length of green ribbon against the perimeter of the box, and glued it in place with the hot melt.


2. Next I had a rummage around my local bead shop for some large beads that would work as accents. I found two sort of Steam-punky keys (which are a symbol of knowledge, and therefore appropriate for a writing set) and a silver Chinese coin with dragons on (for good luck). First, I measured the middle point on the front of the letter holder, marking it with a bit of tailor's chalk, then glued the coin to the front (making sure that it was the right way up). It looked a bit strange on there on its own, so I added a sort of tassel of ribbons to the centre of it.


3. I lined up the keys on the sides of the box, slanting slightly, to cover the edge of the seam, and glued those in place.


4. Using a damp cloth I cleared away any excess glue from around the box and finished smoothing out any remaining wrinkles in the fabric.


Voila! The finished writing set. I thought it turned out rather well, and from her reaction I'd say Bones appreciated the effort :)


Sunday, 7 August 2011

Starry earrings

Bones here! Long time no see! So, I thought it was about time I took back the spotlight ;)

Well what I bring before you tonight my fellow crafters are earrings I made for one of my housemates from university last Christmas.

For these you'll need:

- Earring hooks
- A length of fine chain
- Headpins
- Beads (I used a star bead, two smaller clear oval beads, and two rounded beads as you can see, but these can be anything you want to use - I'd tend to keep your 'accessory' beads (i.e. the oval ones) smaller than the 'main' bead (i.e. the star)
- A couple of what I would call 'spacers' - the silver bits below each star bead
- Jewellery pliers - I used round-nose and thin flat-nose pliers

First off, I measured the chain to each length I wanted. I decided to try and get each piece a different length so that the star bead would stay the main focus and be accentuated by the oval beads. This was fiddly, but if you can keep your patience it's worth while! You need to remeber as well that the beads will hang longer than the chain and will have a small drop from the actual ear (because of the hook!), so it's always a good idea to hold the chain up to your ear just to see how long it might end up!

When you have your 3 lengths (for one earring - 6 for both!) you'll need to start assembling your beads. On your longest piece you'll want your feature bead. Get a headpin and place one 'spacer', main bead and a round bead on it. Bend your headpin to create a hook and then place through the end link of the chain. Carefully keeping this link in your 'hook' bend the wire around your round-nose pliers to form a loop so that you have a couple of millimetres between the bottom of the loop and the top bead. Take the end of the wire around the bottom of the loop a couple of times to close this gap and cut off any excess. You should have a bead attached to the chain! Repeat this with the other beads and chains!

The next thing is to put the chains on the earring hooks. All this needs is for the end link to be separated and then placed onto the loop on the end of the earring hook. You'll want each oval bead to frame your feature bead, so put your feature bead chain on in the middle. Once you've attached these you're all done! All that's left is to wear them with pride!


Or in my case send them to someone else who will! ;)

I'll do another post soon with a pictoral step-by-step... I sent these off before I took photos! D'oh!

Anyway, enjoy and be crafty! ;)

Witch's Writing Set, Part One


Me and Bonesy are big Harry Potter fans - like you couldn't tell - so for her birthday I decided to make something faintly Hogwarts related. I looked at owls, and although they were reasonably priced, the implications of raising an owl in an urban community were complicated, so I settled for a writing set instead :)


Here's part one of the how to:


I managed to track down a letter holder type object, so I didn't have to make that, but there are pretty good cardboard makes out there if you need them. When we moved I managed to sort through my fabric collection and came across the perfect covering material: black, not too fine, fairly practical.


What you'll need for the box:

Letter holding thingy

Covering fabric of your choice

Ribbon of your choice

Cardboard tube

Small cardboard boxes (these and the tube can easily be made from cardboard - I just happened to have them)

Scissors

Glue gun / PVA

Decorations

Now, when I started this project I'd lost my glue gun, but if you have one I'd recommend using it from the start.


I also put together a few bits that I couldn't make (from here, an excellent website):

Ink

An emerald turkey quill

Parchment


1. Since the box thingy was covered with a shiny laminate type affair I gave it a light sanding so the glue would take more easily, then I put on the glue - you have to wait a few minutes for it to get properly tacky.


2. It was quite tricky to get the covering material folded over properly - in the end I put in a couple of tiny stitches to hold it in place, and used electrical tape to hold it in place until the glue dried.


3. Once the glue had dried, which took a while, I cut a section of the cardboard tubing to hold the quill. Once I covered it I slotted it into place inside the box thingy, and smoothed out the wrinkles in the covering material with a sliver of cardboard. Since the small box for the ink is unlikely to be seen, it didn'tneed a covering; the shot below is of the inside of the box thingy, with one half of the covering material smoothed out.


Well, that's all for this week. Next week: decoration :D