Styna, Munchkin and Bones!

Styna, Munchkin and Bones!
Mischief Managed!
Showing posts with label witch. Show all posts

Friday, 14 October 2011

Gemma's Wand


As part of her birthday present, I made Bonesy a wand.


You will need:

A stick (should be roughly the right length and feel good in the hand)

Cutting tools

Knife

Sandpaper

Ribbon (optional)

Charm (optional)

Glue gun (optional)


Common Sense (always be very careful when handing cutting tools and blades)


1. Luckily, I have access to an oak tree (planted by my Uncle), so I cut a couple of sticks from one of the branches and left them to dry for a couple of weeks, but found sticks are just as good. If you don't know what wood it is, it might be worth stripping the bark off part that you don't intend to use and seeing what colour it turns as it dries. The wood I chose was white oak, which looks really pretty when it dries, and a little (creepily) like bone, which seemed appropriate, given that this was for Bones :).


2. When the wood was dry, I chose a piece of stick with a helpful knobbly bit in the middle that looked like it would make a good handle-top. Then, I cut the wand to a good size, which more or less means 'a size that feels right to you, and doesn't look too silly when wafting about'; I made sure that it was slightly bigger at the 'magic' end to allow for further shrinkage through drying and shaping.


3. Next, I stripped the bark from the 'wand end', up to the knobbly bit at the top of the handle, and shaped the tip of the wand to be slightly pointy.


4. I sanded the top of the wand to make it smooth, and to remove any remaining bits of bark. The wand looked pretty good at this point, and I'm all for servicable wands, but since this was a special occasion, I decided to personalise it a bit.


5. Cutting a length of ribbon (matching the ribbon I used for the Witch's Writing Set), I secured one end of the ribbon to the top of the handle with the glue gun and wrapped the ribbon tightly around the handle. I threaded a silver leaf charm onto the ribbon and continued wrapping until I ran out of ribbon, tucking the end in and securing it with the glue gun.


And there you have it, a white oak wand, for a white witch :)

Witch's Writing Set, Part Two


This part of the recipe is all about decoration; for the first half of the Writing Set, see my earlier post.


You will need:

Ribbon (in a colour of your choice), I chose green

Decorations (that go with your colour choice), I chose keys and a chinese coin

Glue gun

Damp cloth


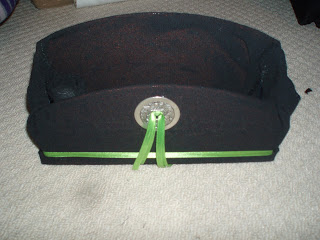
1. The letter holder thing that I started with had a slightly wider base than its walls, so I decided to add my trim just above that to accentuate the shape. I measured a length of green ribbon against the perimeter of the box, and glued it in place with the hot melt.


2. Next I had a rummage around my local bead shop for some large beads that would work as accents. I found two sort of Steam-punky keys (which are a symbol of knowledge, and therefore appropriate for a writing set) and a silver Chinese coin with dragons on (for good luck). First, I measured the middle point on the front of the letter holder, marking it with a bit of tailor's chalk, then glued the coin to the front (making sure that it was the right way up). It looked a bit strange on there on its own, so I added a sort of tassel of ribbons to the centre of it.


3. I lined up the keys on the sides of the box, slanting slightly, to cover the edge of the seam, and glued those in place.


4. Using a damp cloth I cleared away any excess glue from around the box and finished smoothing out any remaining wrinkles in the fabric.


Voila! The finished writing set. I thought it turned out rather well, and from her reaction I'd say Bones appreciated the effort :)


Sunday, 7 August 2011

Witch's Writing Set, Part One


Me and Bonesy are big Harry Potter fans - like you couldn't tell - so for her birthday I decided to make something faintly Hogwarts related. I looked at owls, and although they were reasonably priced, the implications of raising an owl in an urban community were complicated, so I settled for a writing set instead :)


Here's part one of the how to:


I managed to track down a letter holder type object, so I didn't have to make that, but there are pretty good cardboard makes out there if you need them. When we moved I managed to sort through my fabric collection and came across the perfect covering material: black, not too fine, fairly practical.


What you'll need for the box:

Letter holding thingy

Covering fabric of your choice

Ribbon of your choice

Cardboard tube

Small cardboard boxes (these and the tube can easily be made from cardboard - I just happened to have them)

Scissors

Glue gun / PVA

Decorations

Now, when I started this project I'd lost my glue gun, but if you have one I'd recommend using it from the start.


I also put together a few bits that I couldn't make (from here, an excellent website):

Ink

An emerald turkey quill

Parchment


1. Since the box thingy was covered with a shiny laminate type affair I gave it a light sanding so the glue would take more easily, then I put on the glue - you have to wait a few minutes for it to get properly tacky.


2. It was quite tricky to get the covering material folded over properly - in the end I put in a couple of tiny stitches to hold it in place, and used electrical tape to hold it in place until the glue dried.


3. Once the glue had dried, which took a while, I cut a section of the cardboard tubing to hold the quill. Once I covered it I slotted it into place inside the box thingy, and smoothed out the wrinkles in the covering material with a sliver of cardboard. Since the small box for the ink is unlikely to be seen, it didn'tneed a covering; the shot below is of the inside of the box thingy, with one half of the covering material smoothed out.


Well, that's all for this week. Next week: decoration :D